If you’re aiming to gain practical experience in a design field, few approaches are more effective than tackling a DIY project during your free time. These hands-on experiences immerse you in real-world situations, pushing you to apply design principles and develop problem-solving skills that are directly relevant to professional work.
With so many DIY projects out there—each offering unique learning opportunities—it’s essential to first pinpoint the specific skills you want to develop. Are you aiming to improve your proficiency with design or engineering software? Or are you more focused on sharpening your ability to identify and solve design-related problems?
If you’re looking for a project that offers a bit of everything, you’re in the right place. Below is a curated list of five DIY projects, each with a brief overview of the key skills you’ll strengthen throughout the process. As a side note, all software’s mentioned are just suggestions to get you started, but you can try using whichever software you find works best for you.
Industrial Building (Civil/Structural)
When people think of a DIY structural project, a bridge is often the first idea that comes to mind. But why would I recommend designing an industrial building instead? There are a few good reasons.
First, buildings are far more common in our daily lives, which makes them more relatable and easier to understand. They also serve a wide range of purposes—you can design them to house just about anything. Industrial buildings, in particular, strike a good balance when it comes to building codes. They’re complex enough to be educational, but not as restrictive as commercial or residential buildings that require extensive livability standards. This makes them ideal for learning the fundamentals without getting overwhelmed.
Designing a building also helps develop important skills, such as understanding the role location and orientation plays for a structure. You’ll gain experience working with coordinates, site maps, and layout plans. It’s a great introduction to reading and interpreting dimensional information and understanding how various components—like structural members, framework, walls, and floors—must come together. You’ll also gain insight into how a building’s functional needs influence its structural layout. Internal systems—such as plumbing, HVAC, electrical wiring, and mechanical equipment—must all be integrated into the design. This naturally exposes you to a bit of everything, giving it an it an additional advantage for a DIY learning experience.
Commonly used software in structural design includes AutoCAD, Revit, and Tekla. A great way to start one of these projects is to seek out building drawings, or other building sources and refer to them in building out your own structure in one of the listed software, or in constructing a scaled down replica. If you’re looking to improve your skills with any of these tools, designing an industrial building as a DIY project could be a great pick for you.
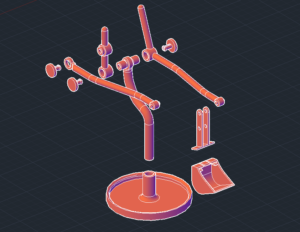
Overhead monorail/Crane (Mechanical)
This DIY project leans more heavily into mechanical design, while still incorporating some aspects of structural engineering. It requires you to consider how the building’s structural frame supports and interacts with the crane’s movement. Although the crane only occupies a portion of the building envelope, its orientation and location must be carefully planned to ensure proper integration and function.
Once the supporting frame is in place, the monorail track can be laid out, and the focus shifts to the mechanical components. For the crane itself, precise attention is needed in its positioning, load balance, and load transfer. Elements like gear mechanisms, lifting ratios, and alignment play a major role. Achieving smooth operation depends on accurate dimensioning and tight tolerance control to ensure all systems function reliably and safely.
Software commonly used in this type of work includes SolidWorks and Autodesk Inventor, which are excellent for modeling and mechanical design. This DIY project brings together elements of mechanical, electrical, and a bit of structural engineering, offering a well-rounded learning experience. It’s also a great way to get comfortable with precise dimensioning and tight tolerances. So if these aspects get your gears revved up, then this may be the project for you to take on.
Mini Hydraulic Arm (Mechanics/ Fluid Mechanics)
This DIY project is a great introduction to the fundamentals of mechanics. It emphasizes the importance of geometry, precise dimensions, and how these elements work together with the hydraulic system—the source that enables the arm to move. To design the mechanisms effectively, you’ll need to study the range of motion you want the arm to achieve. This includes the movement of the arm itself, the dexterity of the grabber (or hand), its ability to rotate around the base, and how it operates around its fixed point.
As you add complexity, you’ll find that the size of the arm directly impacts the degrees of movement and how realistically the hydraulic components can be integrated into its function.
Along the way, you’ll become familiar with key mechanical engineering concepts such as levers, linkages, pivots, torque, and force distribution. You’ll also touch on material science—understanding how different materials handle stress and strain, and how those properties influence the arm’s overall performance.
Working with hydraulics will deepen your understanding of fluid mechanics and how fluid movement can be converted into mechanical motion. In beginner projects, hydraulic pistons are typically used to create movement. Within a single system, you’ll explore how the dimensions of the pistons relate to displacement and travel distance. As you manipulate one end of the system, you’ll observe how it affects motion on the other end. This process helps you think critically about how to control and transform energy into the specific movements and force needed to design the arm’s dexterity and strength.
To get started, you might explore drafting software like AutoCAD, which can help you refine the geometry of your design, and simulation tools like FLUIDSIM to model hydraulic behavior. These are just a few examples—any software that serves similar functions for design and simulation can be equally valuable.
Drone or Quadcopter Frame (Aerospace/ Mechanical)
This DIY project builds upon the design requirements covered in previous topics by introducing more advanced considerations, such as precise stability, optimized weight distribution, and the integration of electronics. At this stage, the geometry of dimensions and component layout becomes increasingly important, as their placement directly influences key flight characteristics like the center of gravity. This naturally leads to a deeper understanding of drone flight performance. The positioning of each component is critical—shifting even a single element can affect the overall balance. Engaging with these challenges helps develop skills commonly applied in the aerospace industry. As a bonus, you can get into thinking about wire management for all parts.
Depending on the drone’s intended purpose, aerodynamics can play a significant role in the body design. Some drones feature a simple flat frame where components are mounted openly, while others use streamlined, aerodynamic casings that enclose the internal parts. Flat-frame drones are easier to design, build, and repair, making them ideal for beginners or quick prototyping. In contrast, aerodynamic designs offer improved flight performance but are more complex to develop and harder to repair. If you’re looking for a challenge right from the start, aerodynamic bodies might be the way to go—but for most beginners, the simpler flat-body design is the recommended starting point.
When it comes to designing your own drone frame, you can start with simple drafting programs like AutoCAD for basic layouts. For more complex 3D designs, especially those involving aerodynamic curves, tools like Fusion 360 or SolidWorks are excellent choices. If you’re ready to go beyond just the physical frame and explore the internal components needed to build a functional drone, you might consider using XFLR5 for aerodynamic analysis and KiCad or Eagle for designing electronic circuitry.
Gear box/ Differential System (Mechanical)
This DIY project is a great opportunity because gearboxes and differential systems are essential components in many mechanical applications. Working with them helps you build versatile skills that apply across a wide range of systems. Like the other projects mentioned, you’ll gain a solid understanding of dimensional geometry—this time in the context of rotational motion, gear ratios, and how different gear shapes affect performance. If you choose to explore further, you’ll start to see how these concepts connect to torque transmission and angular velocity, revealing the deeper mechanics at play.
As you move into the fabrication stage of your design, additional considerations will start to emerge—such as manufacturability, tolerances, and ease of assembly. These factors play a crucial role in the success of mechanical systems like gearboxes and differentials. With so many elements involved, it might seem like a big leap at first. But if you’re someone who enjoys tinkering, problem-solving, and fine-tuning until everything fits and functions just right, this project will feel both rewarding and familiar.
In addition to basic drafting software, you may want to familiarize yourself with industry-relevant tools like SolidWorks, CATIA, or Fusion 360, which are commonly used to model complex mechanical parts.
Conclusion
DIY projects are a great way to build and refine your skills during your free time, allowing you to work on something you’re passionate about while preparing for real-world design challenges. With so many options to choose from, hopefully this article has helped you narrow down a few solid starting points. Feel free to comment if you have more insight to add!