Designing anything takes countless hours of thought, hard work, and refinement to tackle every challenge… but designing something to function in space? That’s a whole other level. The recent engineering challenge of designing a safety system for the moon’s surface has been taken on by thousands of engineers and designers—including myself. Where everyone has spent immeasurable collective hours to prep their designs, there can only be three winners. The winners can be found on NASAs website announcing the challenge winners: https://www.herox.com/NASASouthPoleSafety/update/7592
The only thing more thrilling than hearing the challenge winners is uncovering how they tackled it and quenching our curiosity about their approach. The catch, however, is that aside from revealing the winners’ names and their designs, no detailed information has been shared as of this posts publishing date. The lack of insight into the process leaves many wondering how their submissions measure up. Reviewing others’ designs, especially those with different perspectives, can be incredibly valuable. Sharing this information can open up new ideas and inspire future designs, fostering a collaborative environment that helps everyone grow and improve. As such, I would like to reveal my submission to this challenge and discuss some of the thought processes I used to get to my final product. While I didn’t win the challenge, the opportunity to step outside my usual area of expertise and take on something new has been an incredibly rewarding experience. I often think about my experiences on this and even have imagined up alternate designs for a lunar rescue system since then that could have even impacted my design if I had those thoughts before. If another challenge like this comes up, I’d love to participate again. For now, though, I’ll be sharing my approach to this project, which you can consider a follow-up to one of my earlier posts, where I dive into the process of design and engineering. Refer to the other post to reference the design process. https://draftingiteration.com/an-unusual-design-exercise-lunar-rescue-system/
A Quick Refresher on the Project Scope
During November of 2024, NASA had come forward with a challenge to the public in designing a compact and functionally efficient system for cases of astronaut rescue on the lunar surface. With the Artemis III mission, two astronaut crew members will set foot on the lunar south pole. As this is a mission that will be slotted prior to any missions with reliable transportation equipment, the two astronauts will be exploring the hazardous terrain by foot. Given harsh factors such as un even ground, large craters and vastly varying slopes (not to mention working in a vacuum with temperature variations ranging from -173C to 127C ) the possibility of incapacitation of either crew member is a serious concern. To remedy this, each astronaut will need to be equipped with a method of safely transporting their crewmember to safety in the case of an emergency event. This equipment of theirs must be light mass (23kgs or less), compact and easy to deploy with the availability of only one crew member during a stressful situation. How to solve this problem? Hand it over to many eager designers and engineers wishing to push themselves and their capabilities to the next level.
Ask and Research
To begin this endeavor I first had to get myself acquainted with some of the variables that I would come across that could be possible issues. Apart from the information provided by the initial post for the competition, I went forward with finding any resources available that would provide additional insight. Many of these resources involved reading research papers that discussed anywhere from conceptual designs for second generation lunar equipment to impacts of lunar regolith on materials. The initial approach was to get a better understanding of the environment and the intricate details that come into play. Some of the following are just a few of the variables that had to be understood prior to developing something that could function on the lunar surface;
- Reduced Gravity
- Regolith shape and properties (jagged and sharp due to lack of erosion)
- Electrostatic affects on equipment (Regolith is highly induced to static electricity, which can stick to everywhere where you don’t want it to go)
- Lunar terrain (The competition page went into detail on this, giving the surface a image of ranging slopes, loose cliffs, uneasy “topsoil”, all among an expanse of a dark setting)
- Average density of lunar terrain
Any one of these points, and many more, became prevalent at the process, but also introduced newer concepts as design progressed, leading to more redesigns, but we will get into that later in this article.
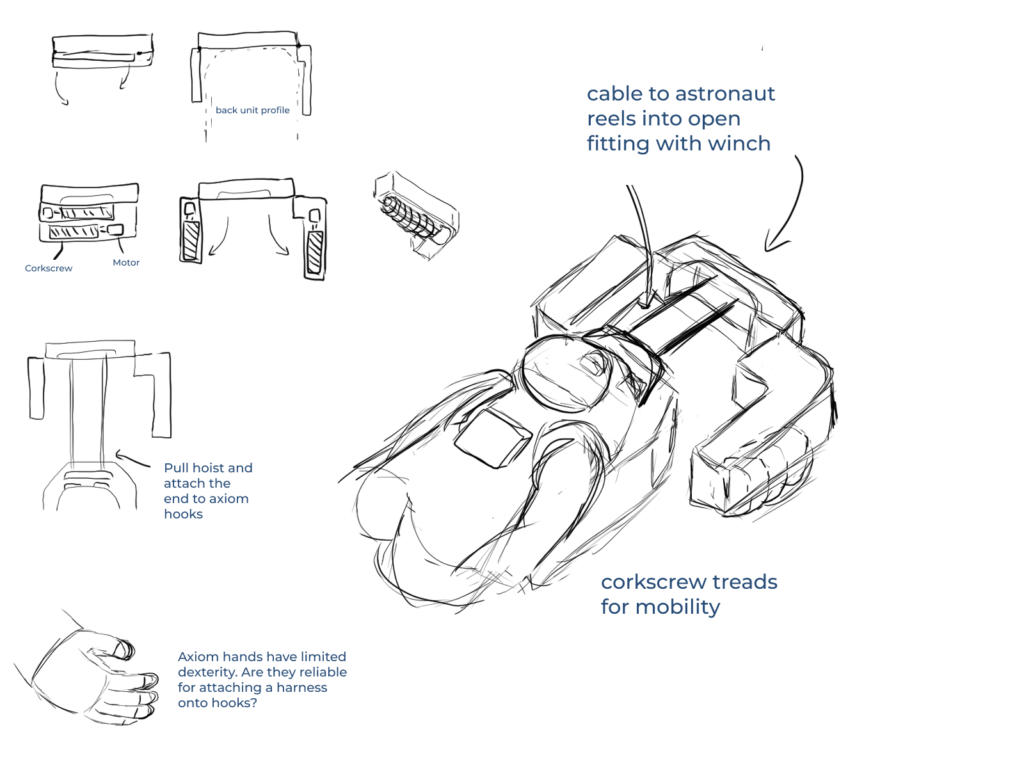
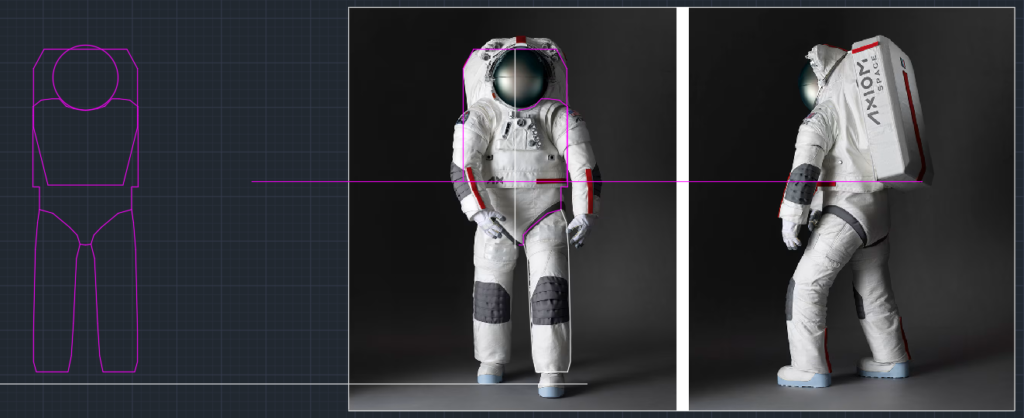
The second half of this research phase lead to understanding how we interact with the environment and how to make it easier to navigate. That may sound easier said than done, as all functions of this design must be performed while wearing a heavily bloated and confining space suit. The space suit used for the next lunar mission, the Axiom Extravehicular Mobility Unit (AxEMU), is a marvel in engineering and is an essential aspect to humans maneuvering on the moons surface. Much respect goes out to all the engineers behind it’s inception, but an unfortunate aspect of the suit which with todays technology cannot be bypassed is the significant limitations it gives to the wearers movements. To gain a clearer understanding of the suit’s restrictions and other features, the competition page offered a downloadable set of photos showcasing a harness point located on top of the helmet. While this information helped get me started, it didn’t provide enough detail for creating a solid design. After searching extensively online, the most useful resource I found that demonstrated the suit’s performance was a YouTube video titled ‘I Tested NASA’s New Space Suit (Ft. Axiom Space) by Cleo Abram’ (I’m curious if anyone else used this same video and spent hours trying to absorb as much info from it).
The lunar rescue system must be designed around how much range of motion that an astronaut would have, all while working in an unforgiving environment while in a possibly stressful situation. Considering all of these points, I now start my design process.
Imagine and Plan
With a wealth of knowledge now acquired, the next step was to begin applying these insights into designs that reflected this newfound understanding, which sparked the sketching and iteration process. At times, this process overlapped with the research phase, as I would revisit and integrate new insights from other resources, refining my work to make the iterated designs more cohesive and logical. But constant revisions is the challengingly beauty (or recurring curse) of engineering and design. For the best results, when designing something new, it’s important to sketch out any new ideas that come to mind, even if they may seem completely ridiculous or unrealistic. Any small detail on a sketch can surprisingly find its way to introducing a vital working to the final product. These sketches can even convey very broad ideas that have minimal design practicality, just as long as it is placed down somewhere to inspire the next stages. But with that, lets move on to sharing some of the sketches I came up with on this path.
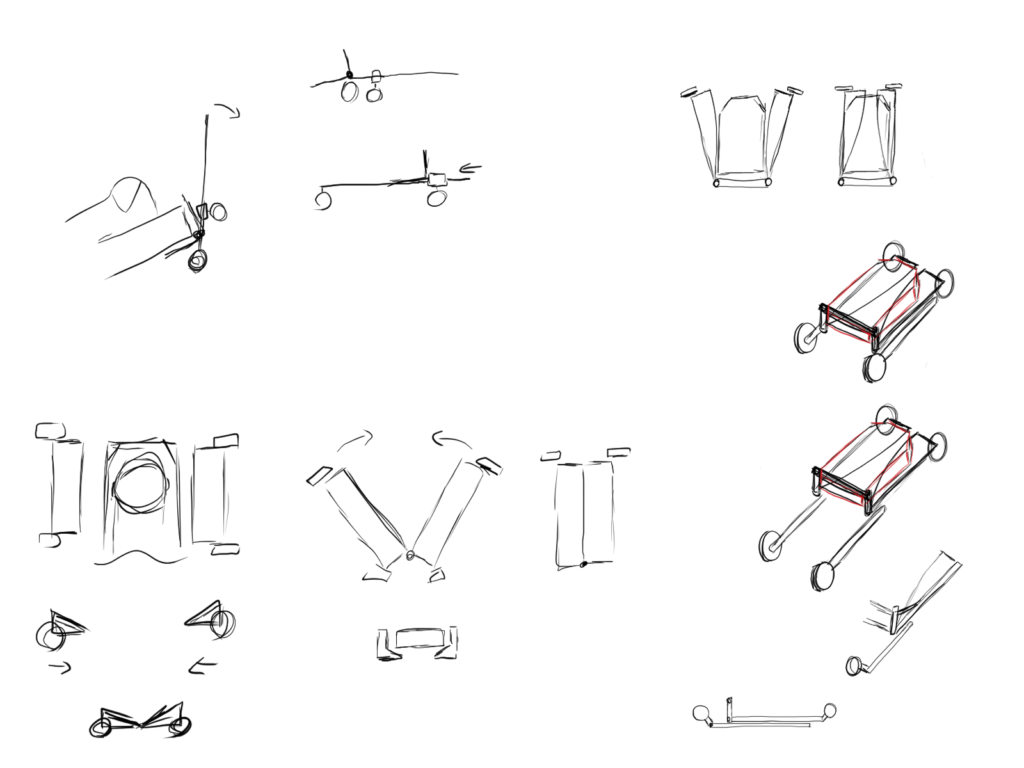
At first, I took into consideration the first observations I have made from the cumbersome suit and tried to minimize the actions required to hook them to a device which would then drag the patient back to base, with minimum exertion for the rescuer. This design would use powered screw treads as the mode of transportation. While this introduces a compact option, I found that this may introduce some complications. The screw treads were intended to make the unit versatile in differing terrain, but it would have to operate with the axel buried in regolith, with would cause way too many problems to count. Speaking of regolith being an issue, the other big glaring problem with this design was that the body of the patient would drag through the regolith, so all further designs involved prevent the body form making contact with the surface while moving. And, it being a powered motorized contraption would add other variables to consider, like exactly how it would be powered. Implementing a power source, like a battery would eat away at precious mass and complicate fabrication, which was the first hint to me that all future design iterations may be better off simplifying it without an on board power source and resort to relying on the rescuer to pull or push the equipment along the surface.
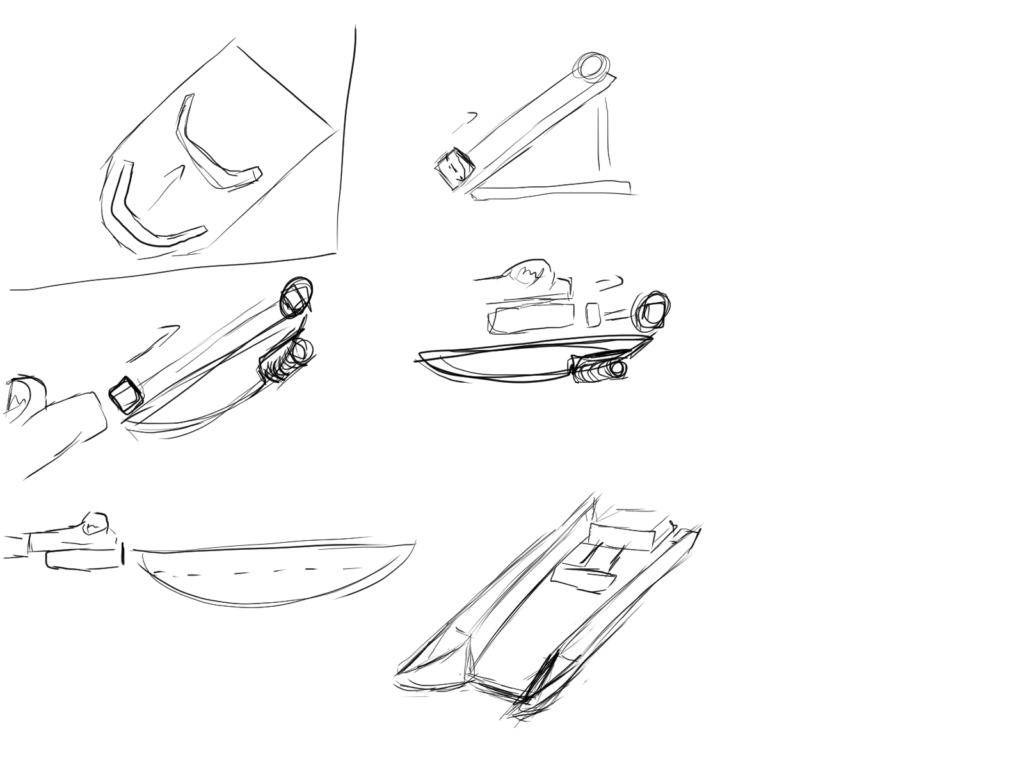
The following sketches reflect my stubbornness with not letting go of an idea, as I make one more attempt to use some form of power source or introduce unnecessary physical contact with the lunar surface. This all had a small improvement, as now we begin presenting ideas where the rescuer could ‘wheel barrel’ the patient back to base, or placing the body of the patient onto a sled or a rug which would be the material that would be the thing that actually drags along the surface. Dragging anything along a surface has the issue of friction. The more surface area dragging on a surface, the more friction there will be, and thus, the more force required to move an object. So both the wheel barrel and sled/rug idea would require the rescuer to exert more energy than we want them to. From this point on, I began sketching out ideas that tired to minimize contact with the ground and increase efficiency.
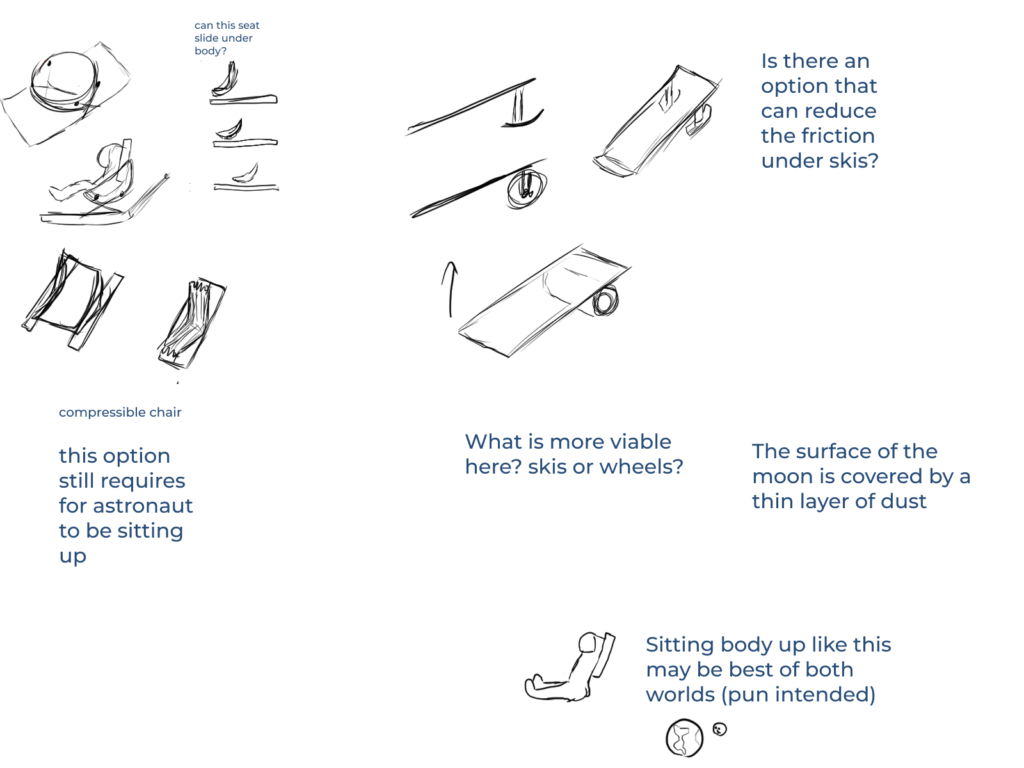
In my effort to minimize body contact with the ground, I started sketching out some basic concepts that involved using a lever mechanism to give the rescuer a mechanical advantage, allowing them to lift the patient onto the apparatus. The early sketches took the form of a litter, which still required the rescuer to drag the patient across the surface, regardless of their position relative to the ground. At this stage, I was still focused on the idea of dragging the patient in some way, aiming to use a material that could easily slide across the regolith. However, I began to question whether sliding would actually provide any real benefit beyond the simplicity of the design, particularly given the compactness of the lunar surface. It was at this point that two new ideas began to converge: making the journey back to base as efficiently as possible (requiring a bit more complexity to the design) and designing a practical way for the rescuer to load the patient onto the apparatus. From the beginning, I first took precedence in making the design more robust and simplistic, but this doesn’t provide much benefit if a tired astronaut must over exert themselves in loading or transporting the patient. This began the next phase of sketches.
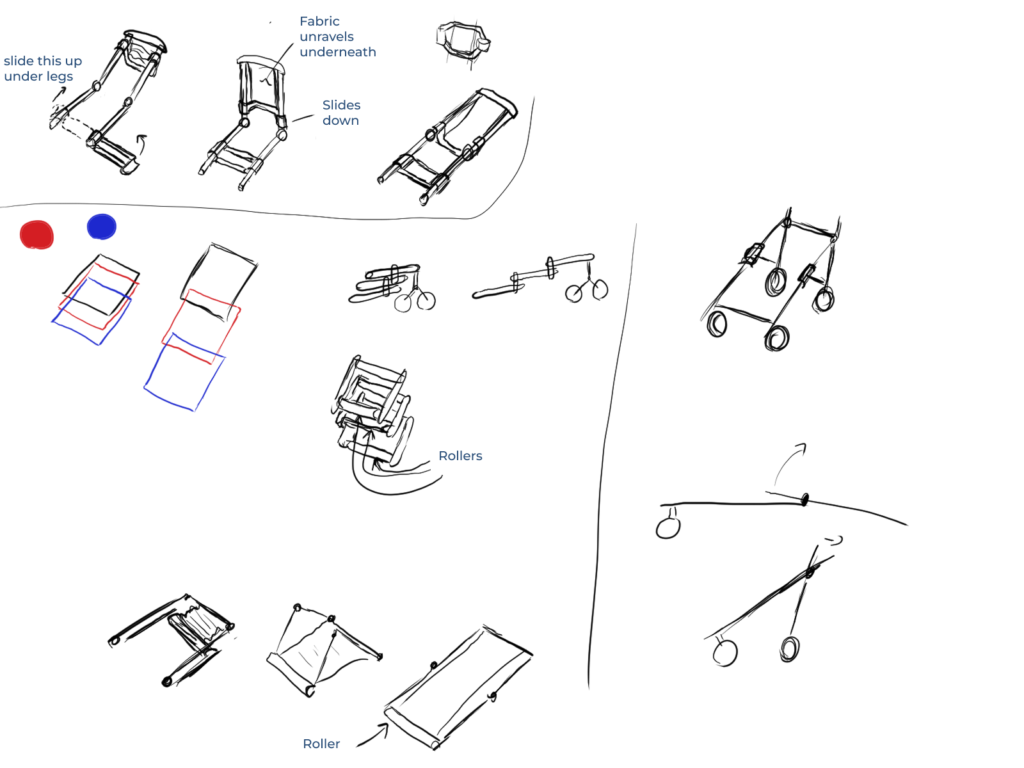
As I worked on these sketches, I drew inspiration from researching other Lunar rescue systems that were being developed at the time. YouTube videos, papers, and various design testing sources provided insight into the ongoing developments. The biggest influences came from the use of wheels and the concept of a more rigid pipe frame to support the patient. In design, it’s often useful to examine widely accepted solutions and see how you can improve upon them, which is the next direction I wanted to explore.
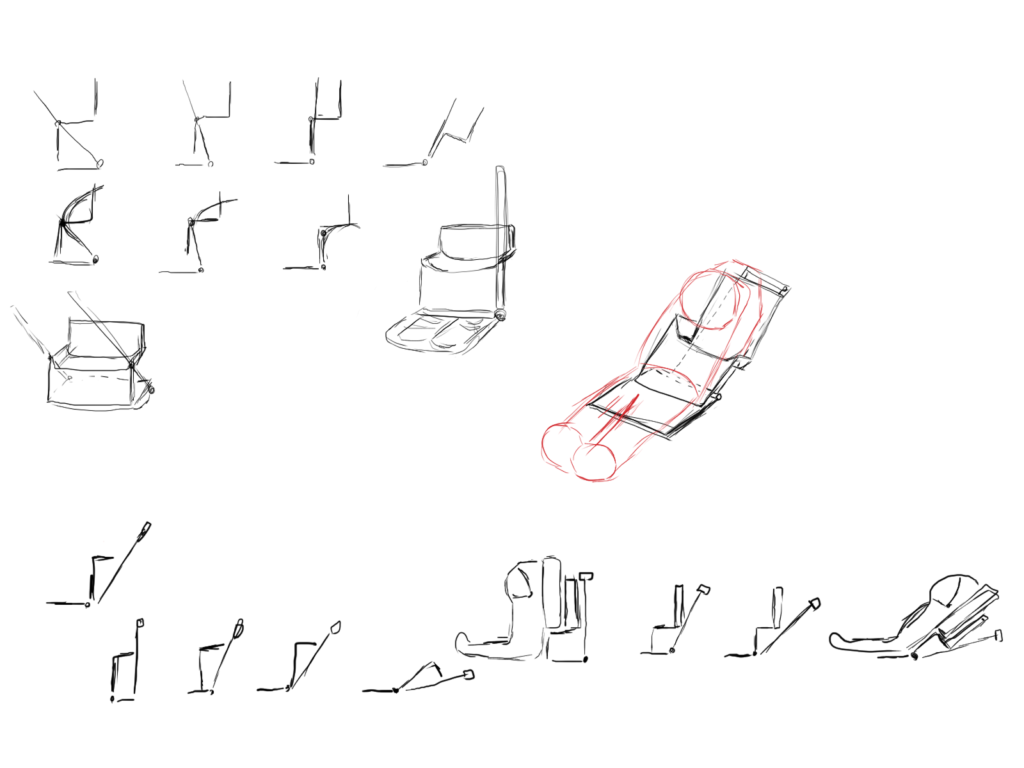
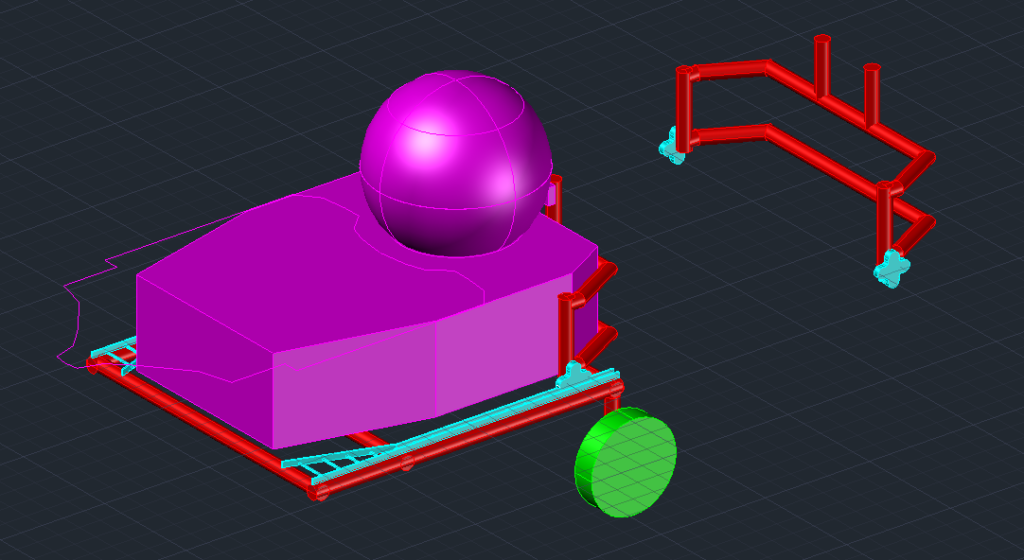
At this point, I arrived at a design that brought me closer to meeting my expectations. I wanted to address a critical challenge that a lone astronaut would inevitably face: how to lift a patient and get them onto an apparatus when you’re by yourself and the very suit that is keeping you alive on the moon is so bulky that it deprives you of the mobility to even perform a proper squat. At this iteration, I began designing the frame to generally be in a ‘U’ shape so that it can be positioned around the profile of the patient. From here, the head hooks of the AxEMU suit would fasten to the frame, lift the patient up with leverage, then swing the bottom foot rest around and hook into the frame to give rigidity to the whole structure. This iteration required some study and detailed inspection, but from here I felt like I was getting closer to what I would want to present.
At this point, I set the previous idea aside for a few days to focus on a concept that had been lingering in the back of my mind. I had been researching other approaches, inspired by the idea of reviewing established solutions for moving an incapacitated person. This involved examining emergency stretchers and studying the methods used to move bodies in these types of situations. Earlier in the project, I had looked into how one person could drag a body, which led to the initial idea of dragging the patient. However, now I wanted to dive deeper into the design of equipment used for more specialized rescue operations. In some situations, rescue teams use a specialized stretcher that detach in two down its center and scoops up the patient on either side to lift them without requiring to move the body very much.
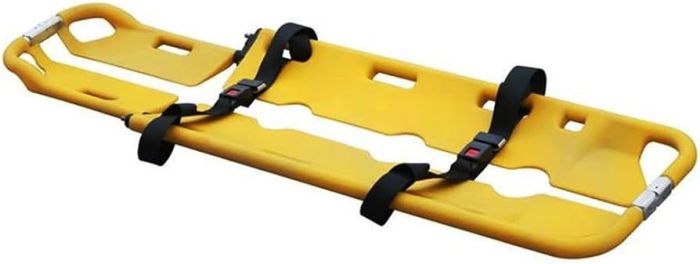
Image source: https://www.harmonymedical.co.uk/rescue-stretcher.html
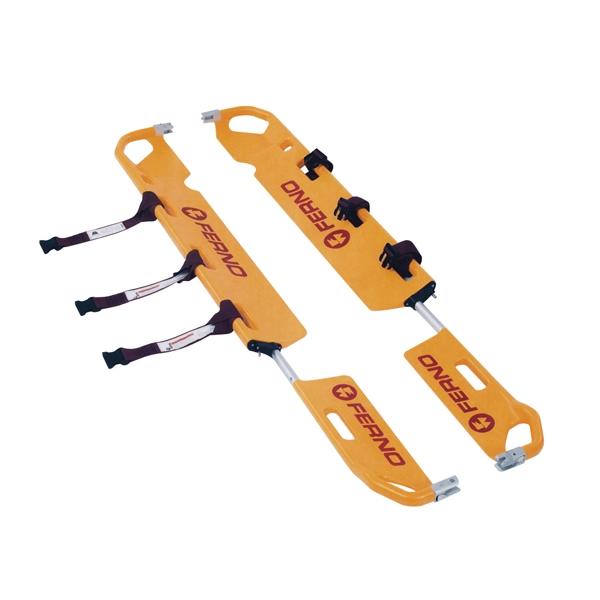
Image source: https://www.ccmed.co.uk/product/ferno-scoop-strecher-65-exl-yellow/
Here are some already well established stretchers used for minimally shifting the patient while securing it under their body. While reviewing some informational videos on how this concept works, one small issue became apparent: although it minimized the adjustments needed to position the stretcher under the patient, these adjustments were still required. A person would need to be positioned on the patients side to minimally roll their body up off the ground while someone else slid the stretcher piece beneath them, working in tandem to make the process practical. I, however thought that there could be a process in which this action could be completed by one person and proceeded to sketch a concept.
With this concept, I adopted the idea of the scoop stretcher and fixed the end point of each half on a pivot so that each half can act as a ‘scissor’ which would require only one person to push the wider ends together to lift the patient off the surface. While this idea shows promise with further refinement, I found that the concept does have its drawbacks. Positioning the apparatus beneath a patient on an uneven surface could be challenging. If not aligned properly, the lifting motion might not raise the patient but instead risk crushing the suit’s internal components. Additionally, fabrication poses another issue—since the apparatus requires complex, custom-shaped parts to perform the lifting action, these would likely need to be either cast or precision-machined. Plastic wouldn’t be a viable option due to its tendency to degrade quickly in high-intensity radiation environments. Without listing off every issue I had with this design, I decided to abandon it and went back to my first option. If I were to design something for this challenge again (and had more time) I would probably pursue this stretcher idea again and find a way to put my own personal touch on it to operate effectively on the moon.
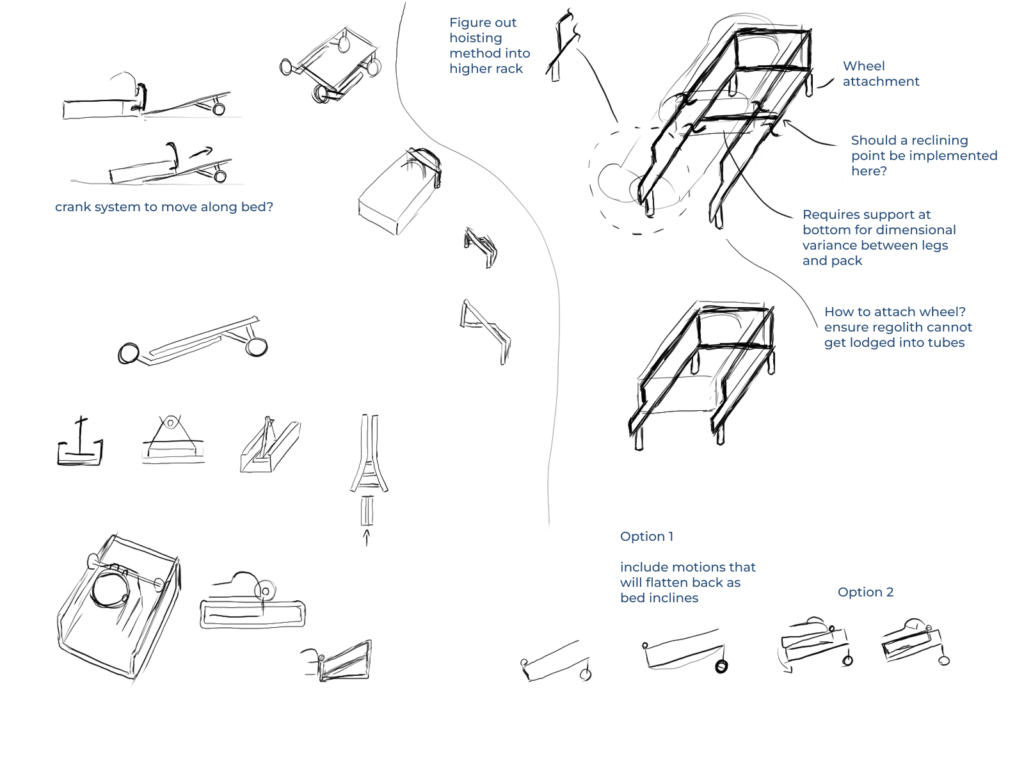
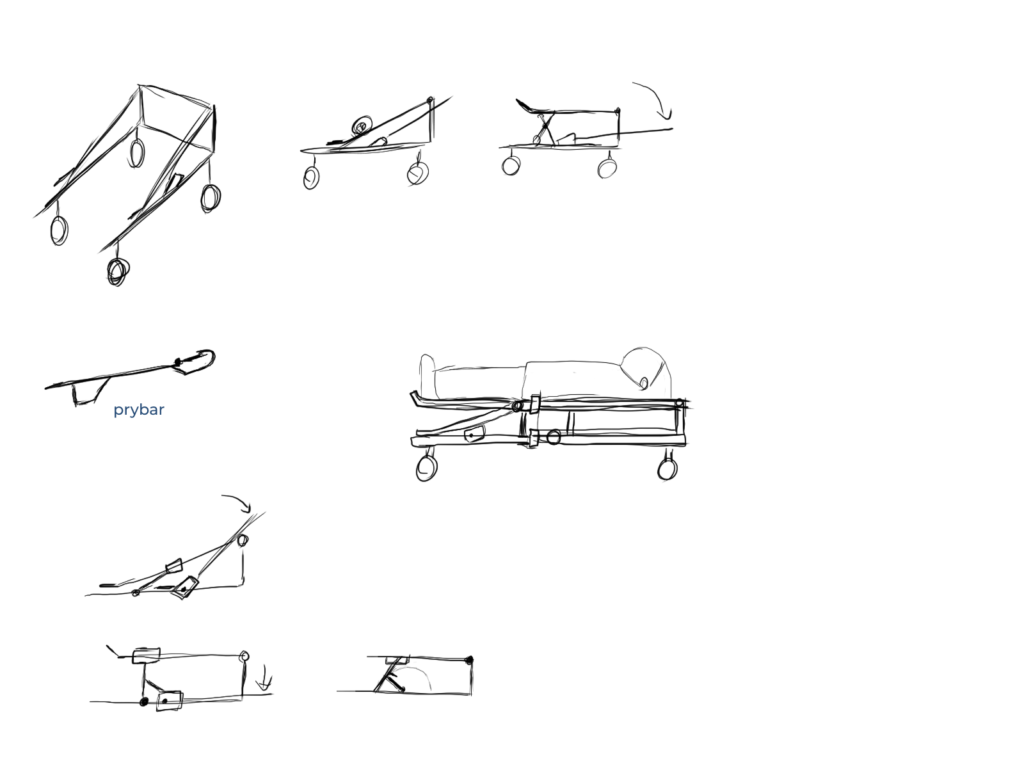
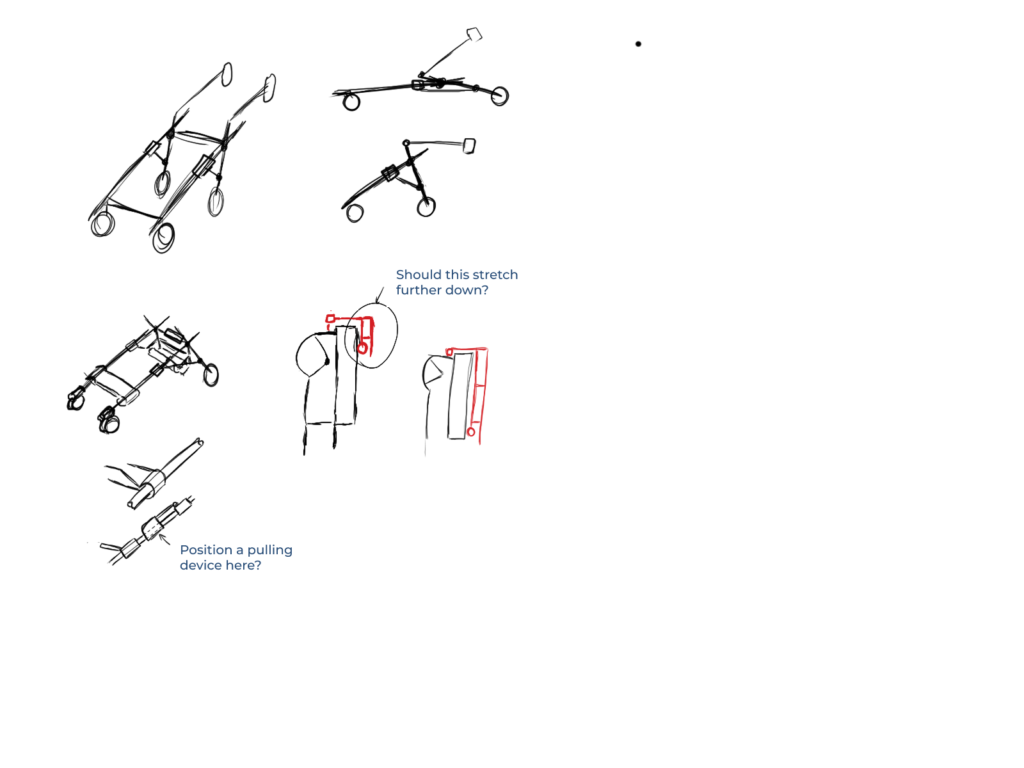
In the final set of sketches, I developed the concept further by designing a frame to support the patient, incorporating a mechanism that allows the apparatus to lift the patient off the ground and transfer them onto the bed using simple mechanical movements—specifically, through the use of a pry bar operated by the rescuer. In this iteration, I intentionally kept the bed low to the ground for two key reasons: first, to minimize the amount of lifting required by the rescuer; and second, to account for challenging terrain. Slopes and hills on the Moon can be quite steep, and a higher bed would make it more difficult to maneuver the apparatus uphill. Considering these factors and reviewing my initial design criteria, I determined that this concept had enough merit to move forward into the next phase of development.
Create and Test
In this stage, I began taking the shape from my final sketch and working it into a tangible design, giving it real dimensions, working the mechanical movements to function properly and making everything fit to the AxEMU. To move forward with the design, I first needed the dimensions of certain components of the suit. Since exact measurements weren’t readily available, I had to source reference images of the suit and estimate the dimensions as accurately as possible. One helpful method involved importing a photo into AutoCAD, scaling it to match the average human height, and tracing over the image to extract usable dimensions. For anyone using this approach, it’s important to note in your design that these measurements should be verified by clients or fabricators. Given the variation in body sizes, I also aimed to develop a design that could accommodate a broad range of body types.
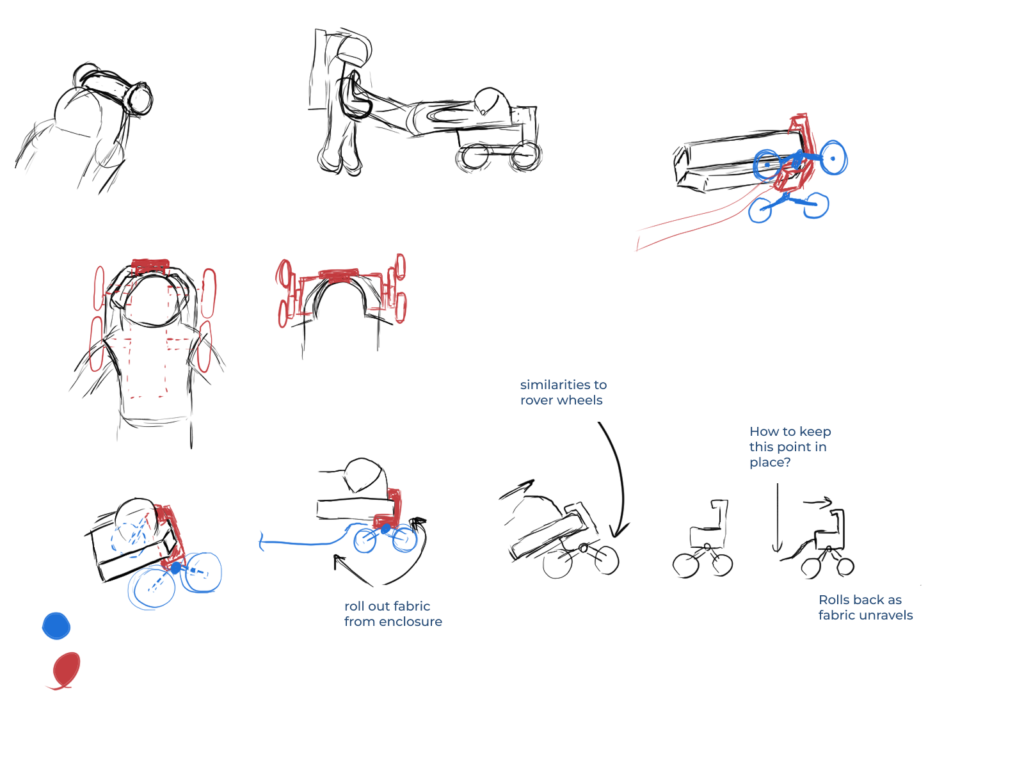
Next, I overlaid the suit outline along the lengths of pipe needed for the frame. With the frame layout taking shape, I began developing the mechanics responsible for lifting the patient and guiding them onto the bed. My initial approach involved designing a guide rail along the top of the frame to help move the astronaut into position. A suit frame would be attached to the hooks at the top of the suit, with a sprocket mounted on either end. These sprockets would engage with the guide rail, and by rotating them—through a mechanical method—the astronaut could be pulled into place.
This design introduced some external challenges, particularly in determining how the sprockets would be rotated—whether through a manual mechanical system or a powered mechanism—both of which would add complexity and increase the overall mass. Because of these factors, I opted for a simpler solution.
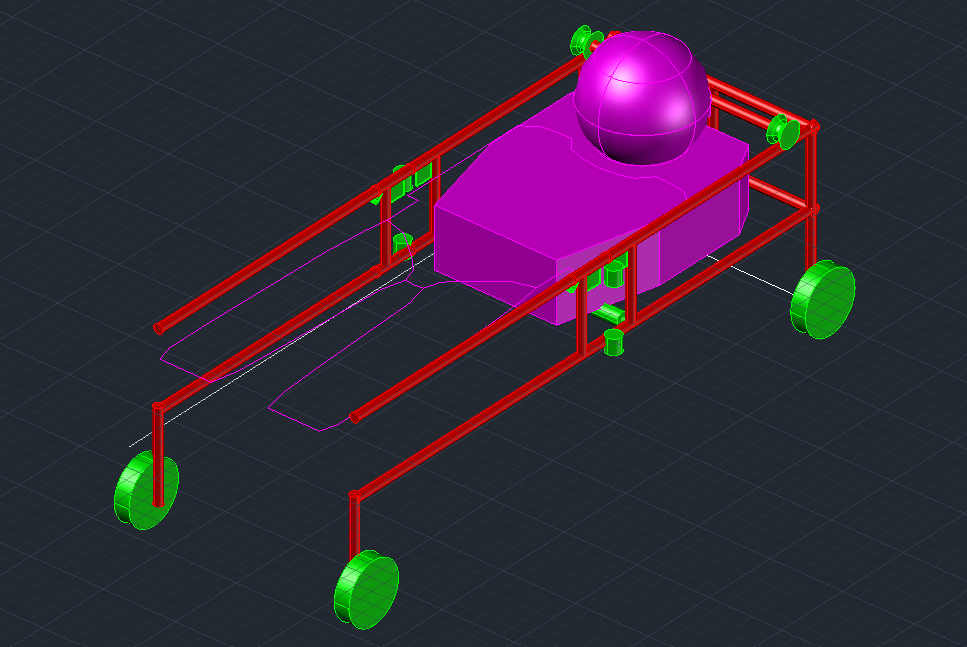
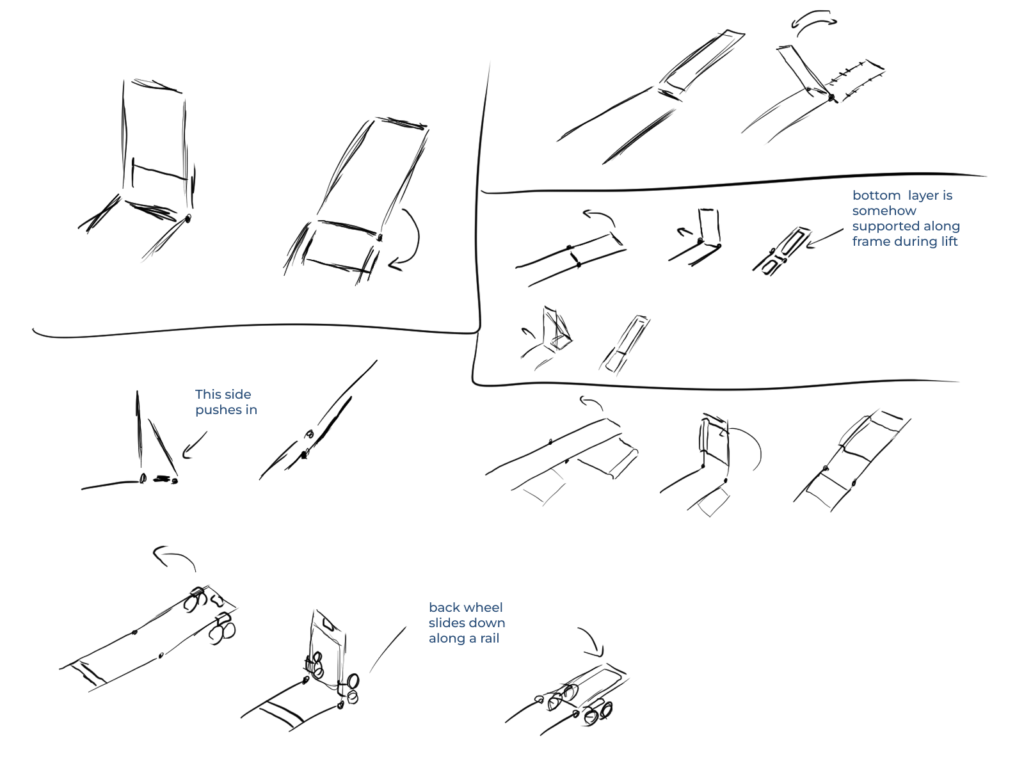
In this iteration of the frame, the suit frame previously attached to the top of the suit was replaced with a simple horizontal bar featuring a guide wheel at each end. This bar rolls smoothly along the top rungs of the frame. The patient could be pulled onto the upper frame either by using a winch or by leveraging a pry bar against the lower horizontal members. The bed frame itself also went through several iterations, particularly in developing a method for it to collapse easily into a compact, transportable form. Additionally, early revisions of the lifting apparatus began, including a feature where the upper portion of the frame near the legs—visible in the image—would drop down to create an inclined rail, allowing the guide wheel to travel upward along the inclined frame. It may be difficult to imagine at this stage, but the next iteration will make more sense. Without getting too much into it, there were some challenges that presented itself that were better bypassed with some readjustments, one of which being the rolling distance of the guide wheels and attempting to figure out how to compact the design further.

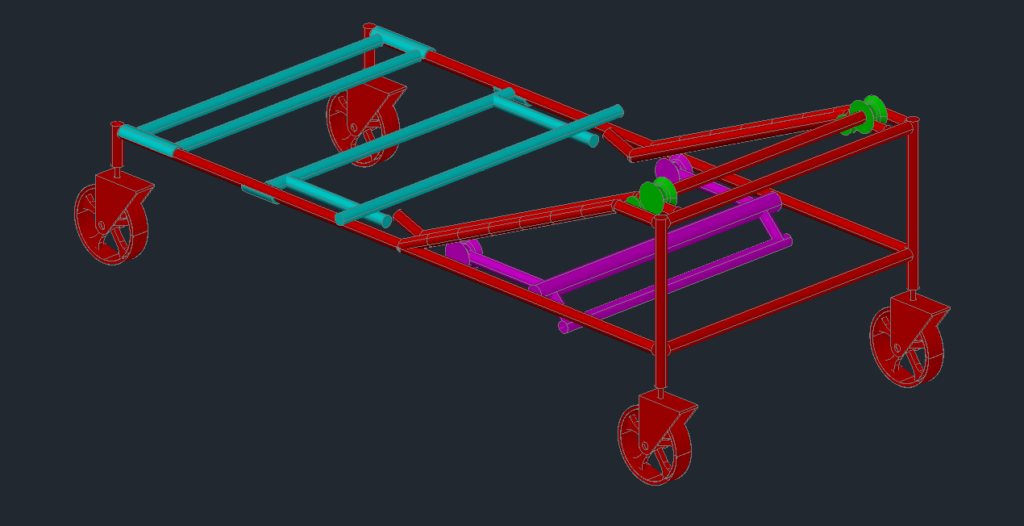
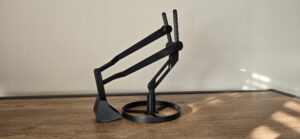
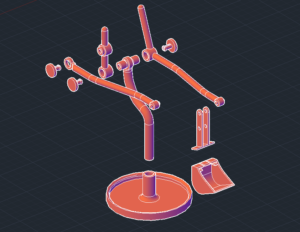
After addressing several of the earlier challenges, we arrive at the final revision. As shown in the screenshots, the main frame is highlighted in red, along with the inclined bars designed to elevate and lift the guide wheel bar connected to the patient’s suit (also in red). The component shown in purple is responsible for raising the inclined bars. It features a side attachment that utilizes rotational movement—activated by a pry bar—to pivot the component and, in turn, elevate the red inclined bar. The components in blue are pieces that are installed after the guide wheel bar (still attached to the suit) has been rolled into its resting place at the end of the top frame. To demonstrate this process further, I have provided some sequencing images that shows how the lifting and loading process will work.
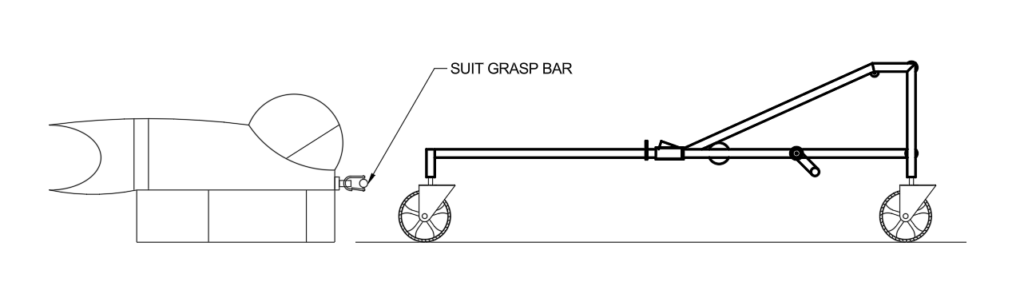
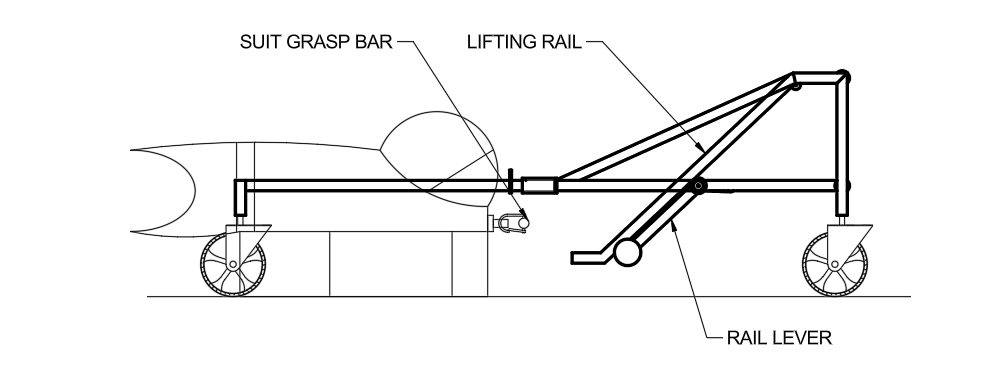
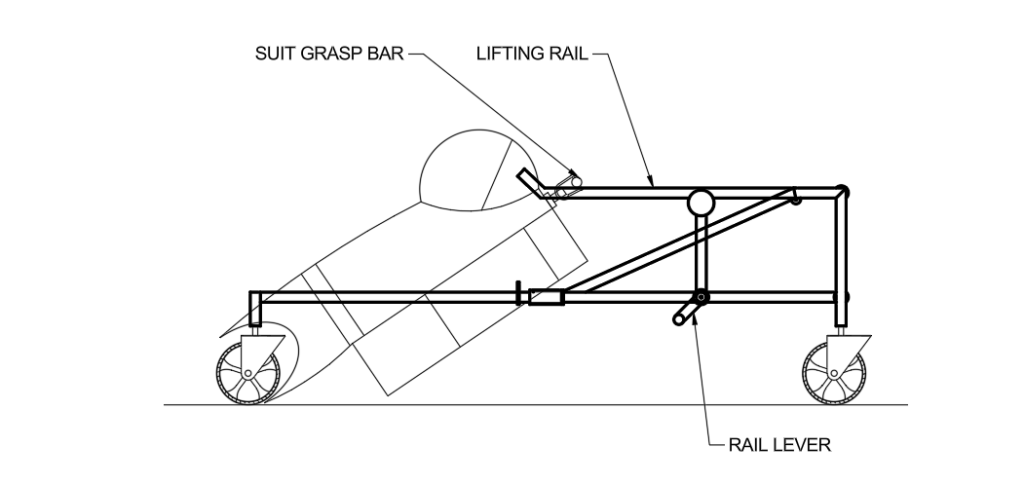
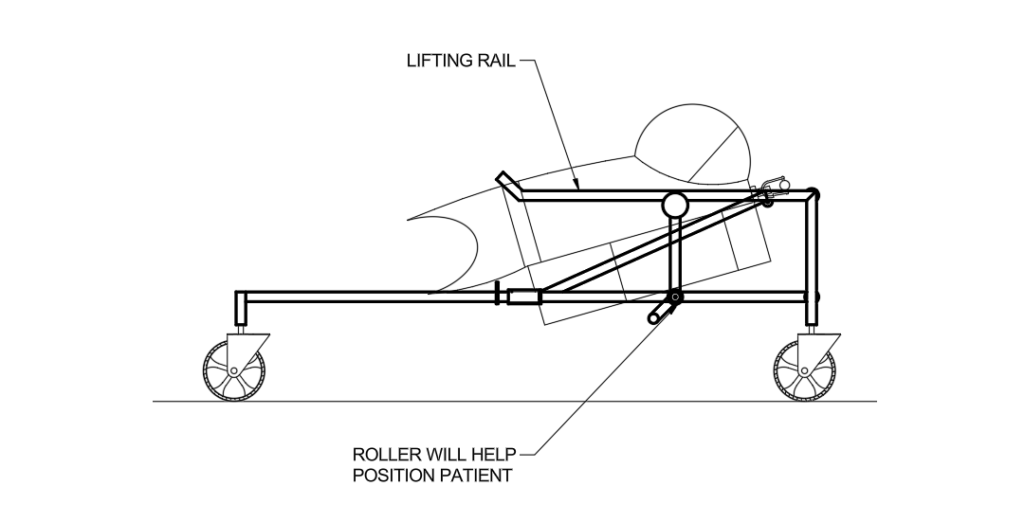

All mechanical movements for loading the patient are intended to be completed by pry bar, giving the rescuer a method in transporting patient back to base. There are few other specifics I have left out of this design for now (as to prevent this article from spanning longer than it already has) but the main working function is presented here.
Iterating and Improvements
This stage of the design process is both exciting and unpredictable—it’s where unexpected challenges can arise and disrupt even the most well-thought-out plans. One moment you’re confident you’ve found the ideal solution, and the next, you encounter a setback that forces you to step back and rethink your approach. Throughout this project, the process of iteration and refinement has been present from the early stages and continued consistently through to the final design, as is the typical journey anyone finds themselves in a project that they invest much of their time and care into. Always push yourself to explore multiple variations of a design—when you find yourself needing to backtrack, you may discover that you’ve already created elements that fit together and offer a solution, as I experienced throughout this project.
Conclusion
Designing something for practical use takes countless hours of research, testing, and iteration before arriving at a reliable solution—especially when working in an environment you’re not familiar with. This engineering challenge was tough, but incredibly rewarding, and everyone who took part walked away with new insights and valuable design experience.
If you’ve made it this far, thank you for taking the time to read about my project journey. Projects like these demand a lot of effort, and condensing everything into a brief summary means some concepts inevitably get glossed over. So if you have any questions or want to dive deeper into the process, feel free to leave a comment and start the conversation!